Introduction
In this article, I will cover some Google Drive tips for teachers. Google Drive is a very handy tool I use every day for creating and sharing documents and spreadsheets. If you want to stay organised, this is one of the best free tools you can use. You can access these tools from your phone and other devices like Chromebooks, laptops and workstations
Google Drive is a free online (cloud-based) storage service that comes from opening your Gmail account (if you don’t already have one, get one, it’s FREE!). It allows you to create, share and store files in one place so that your team members, fellow teachers or students can work together on documents. As a teacher, you can use it for classes, giving students access to the same documents for:
- Attendance monitoring and reporting
- homework
- collaboration with projects
- tests
- surveys
- teacher-student-parent communication
- student achievement and record keeping
By using Google Drive, you can create a shared folder and invite students to it. You can create another and share information and databases with other teachers. You can also share a file directly from your computer with them. It’s also a good way to keep your students’ work organised and easily accessible. You can share files with students in the classroom, or send them home for homework assignments.
If you have not yet learned how to use it, you should get started today! Let’s take a look at some of the basics.
Create a Google Document:
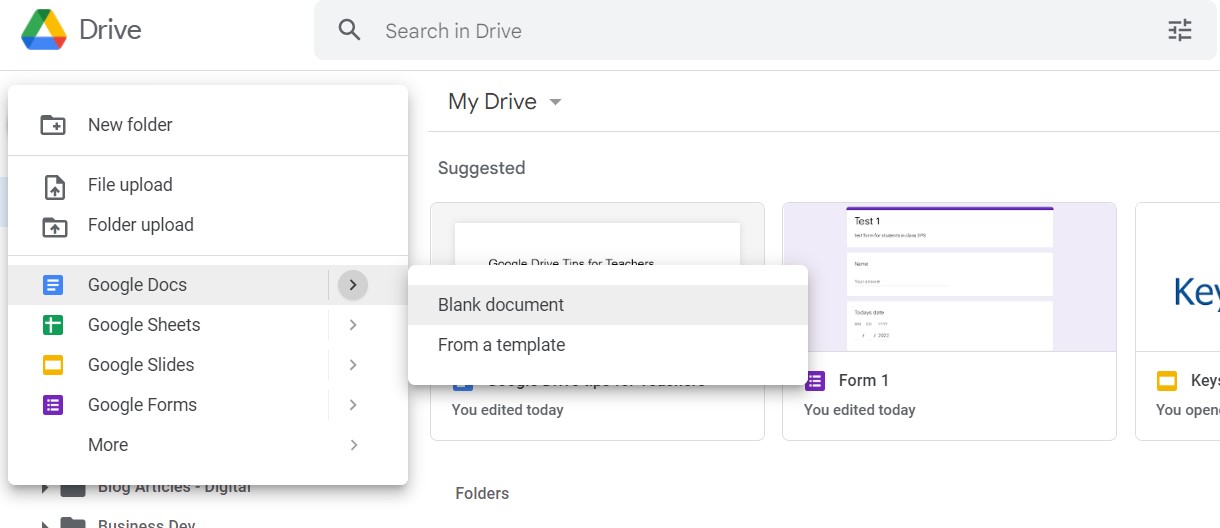
Open your Google Drive. Click the big “+New” button and select > Google Docs > Blank document (as in the picture below). Add text, images, videos and more. Title your document and your work will be saved automatically. If you share this document, students or whoever you select to share it with will be able to view the document on their own devices using a mobile app or web browser.
How to share a document:
You can easily share a document with others by clicking on the “Share” button in the upper right corner of your screen after you have created or opened the document.
Google will then prompt you to choose who to share it with: You can select “Anyone with the link” or “Specific people.” If you choose to share with specific people, Google will then prompt you to enter any email addresses of those individuals you want to share your document.
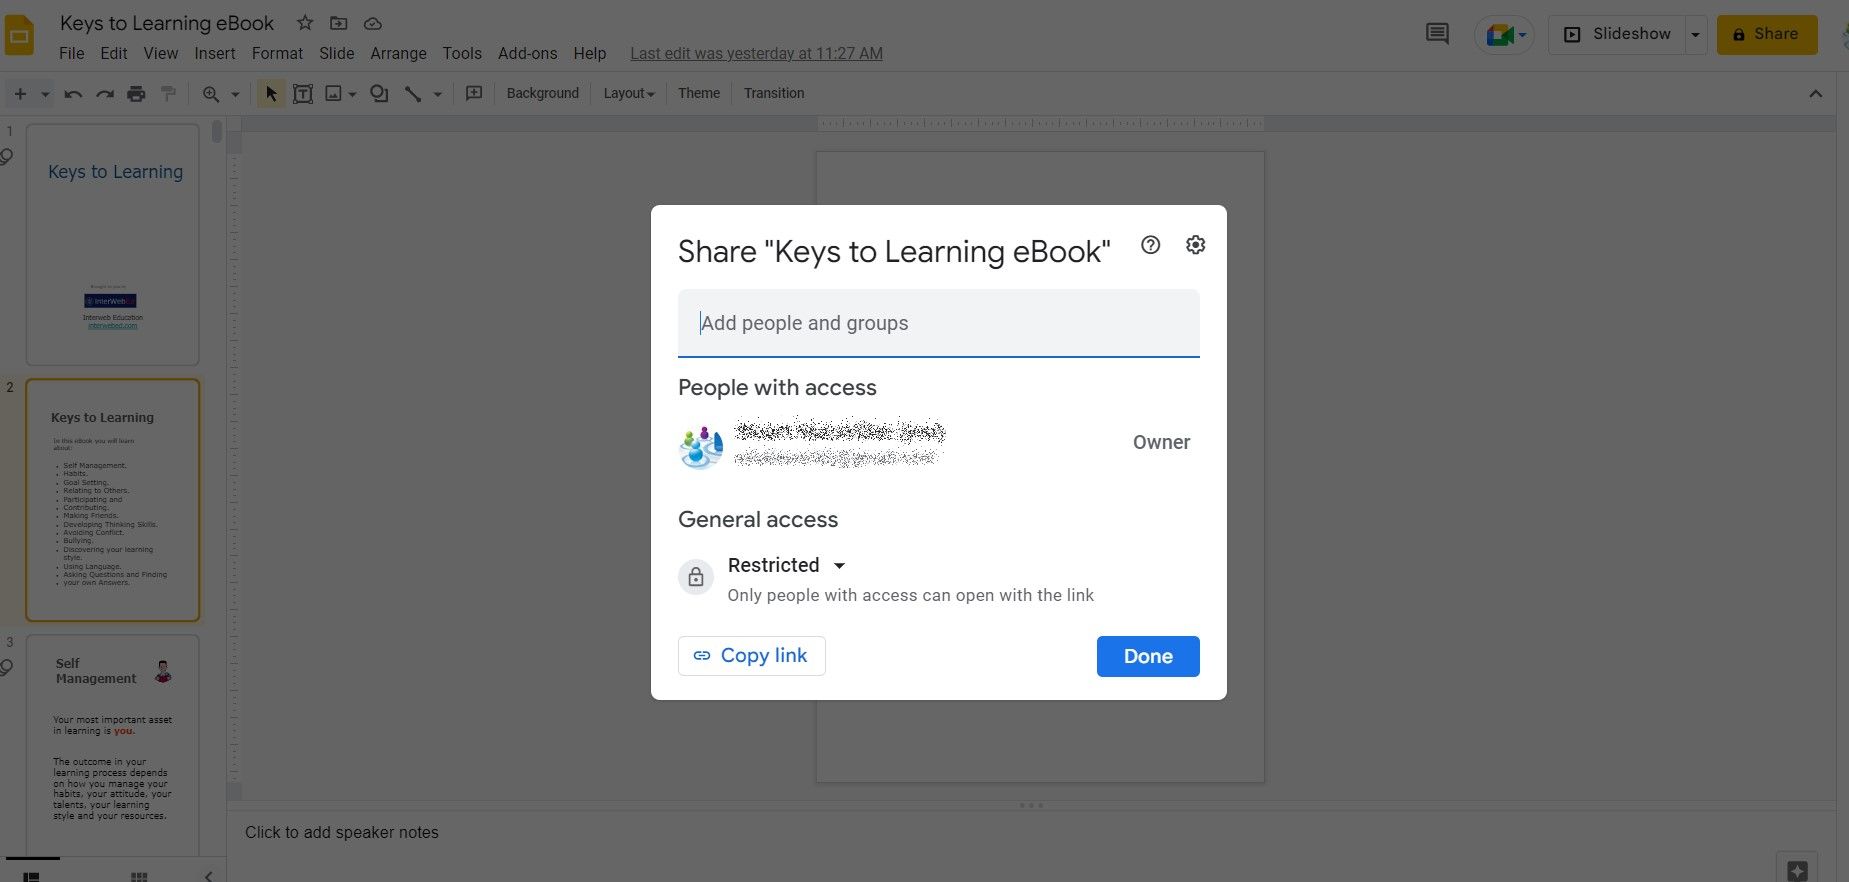
When you share a document with another user, they will receive an email with a link to the file. By clicking that link, they can open it in their own Google Drive and make changes to it. You can see who has made changes by opening the document and reviewing its revision history.
This is also great if you want your students to team up in groups and work on a project together. Students can work together on a single document at the same time from any device with an Internet connection.
As a teacher, you will be able to see who has made input on the project and what their contributions have been. When it comes time to report on a student’s progress, you can tell from their ability to work in a team, cooperate with others or even stand out as a leader.
How to create a survey:
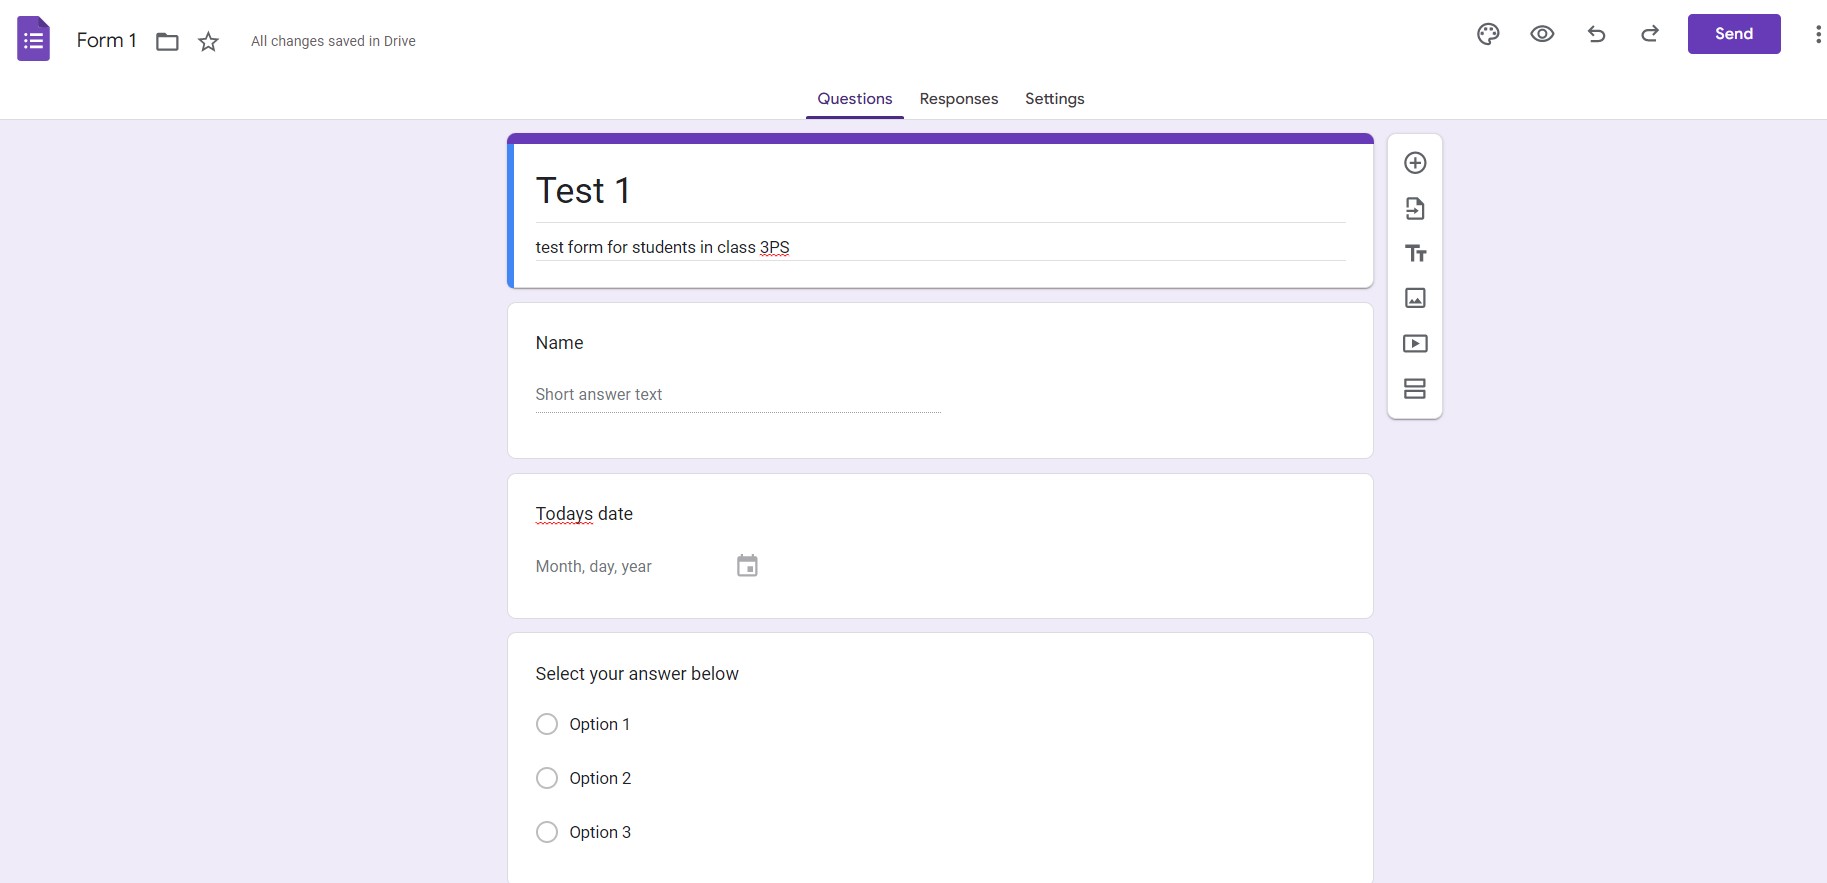
Surveys can be a great way to gather feedback from pupils or parents or poll people on a topic. You can create a survey using Google Forms, which is accessible from the Tools menu in your Google Drive account.
Create tests for students:
Create tests for students: Similar to the surveys above, Google Forms allows you to create multiple-choice quizzes and tests. You can also create one-time or recurring tests for students. Students can access these tests from any device with a web browser, including phones, Chromebooks and laptops.
How to make a form on Google sheets:
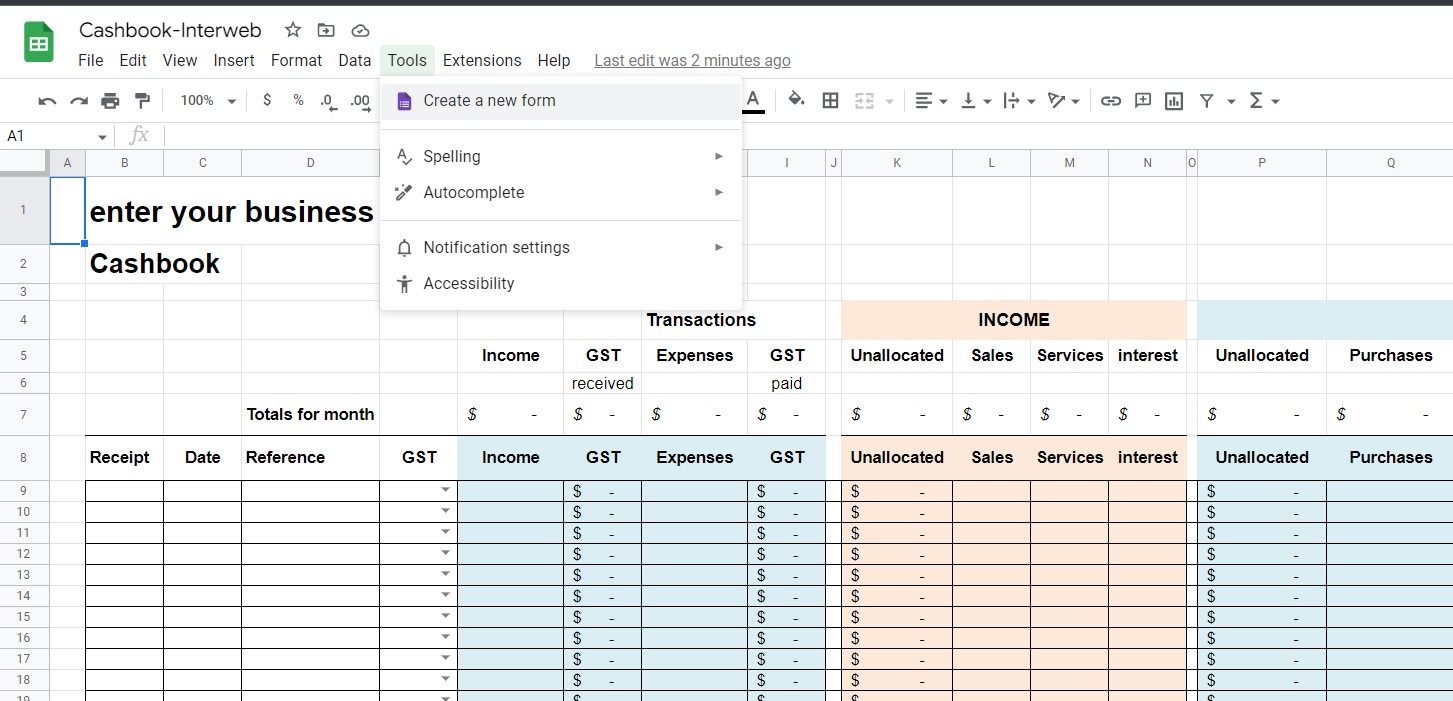
To create a form in Google Sheets, go to the sheet you want to use and click “Form” from the Toos menu on the top. You will see a pop-up box that allows you to choose between creating a new form or editing an existing one. Once you’ve created your form, you can customise it by adding additional questions or fields. You can also choose from a variety of themes to make your form more appealing and user-friendly for students
Share a form with students:
Once you’ve created your form, you can share it with students through Google Classroom. Just click the “Send” button on the right and select “Share this form.” You will be directed to a page where you can enter student email addresses or first and last names (separated by commas).
Share it in the same way as a document above.
Before you share a document, always make sure you have checked your spelling and grammar. I use and recommend a really great, FREE tool called Grammarly.

Sharing a file on Google Drive:
You can also share a file on Google Drive. This is useful if you want to send students a link to an individual file that they can open, edit and save as their own. You do this in a similar way to a doc or sheet. Find the file you want to share on the lefthand side of Google Drive, right click and click “Share” from the menu. Then select “Share with people” and choose whether you want to share with everyone or just specific people (like your students).
This is ideal if you have created worksheets, templates, documents, forms and pictures in one folder. You can then share this entire folder (file) for your students to copy and access. When they complete the assignment or project they can return the file to you in the same way.
Making spreadsheets for class:
You can use Google Sheets to create class rosters and grade books. To do this, make sure students have access to Google Docs (if they don’t already) and then share the spreadsheet with them. You can also add their names and email addresses or first and last names (separated by commas) in the “Add people” box.
Similarly, you can create sheets for every class in your school in one file, share the file with all your teachers and then individual teachers can access the sheet for their class, and record attendance by an allotted time. These sheets are then automatically updated and the office can access these forms and see who is not in class. By crosschecking with your “time off” records you can see if a person is absent without notice and have your attendance officer contact each of them.
For more on attendance, see our Truancy Resource Pack.
Create a Google Slides presentation:
Presentations are a great way to put across a message visually to visual learners. Pictures can create a thousand words and make it easier for your students to remember topics.
Start in the same way you do a document (see above) but select Slides. Then choose the type of slide you want to create and click “Create”. Add text, images, videos and more. Once you’re done, you can share this in the same way as any other Google project above. Students will be able to view the presentation on their own devices using a mobile app or web browser
Send a letter to parents on google drive:
This is a great feature, especially if you have many parents that need to be informed of something. Send a letter to all parents, or send separate letters to each family. You can also add a custom subject line and body to each letter. You can even send letters to specific parents or families using the parents’ names as recipients.
Create a standard letter for many recipients If you have a standard letter that you want to send to many recipients, Google Docs makes it easy. Just create the letter in Google Docs and add all of your recipients as people in that document. Then, when you’re ready to send it out, click on “Send” from the top menu.
Conclusion:
There is a lot you can do with Google Drive and it is simple to learn. Get started now and leave your questions or comments below and make sure you share this page with your social media so others can learn easily.
Thank you!
PS. I still get teachers asking me how to open zip files! This should be something that all teachers should know. If you don’t or someone asks you how read this short article: “how to open a zip file”.
